Top 7 Design Errors That Ruin Inflatable Seals
You think the seal looks perfect until you inflate it.
And suddenly there’s that soft hiss no one wants to hear during a validation test.
Every engineer who’s ever worked with inflatable seals has lived this story at least once. Everything looks great on the CAD model, but the moment air hits, something doesn’t behave the way it should.
The truth is: inflatable seal failures almost always trace back to one simple issue sizing.
Let’s break down 7 sizing mistakes that keep happening across industries from pharmaceutical isolators to vacuum chambers and how to stop them before they ruin your design.
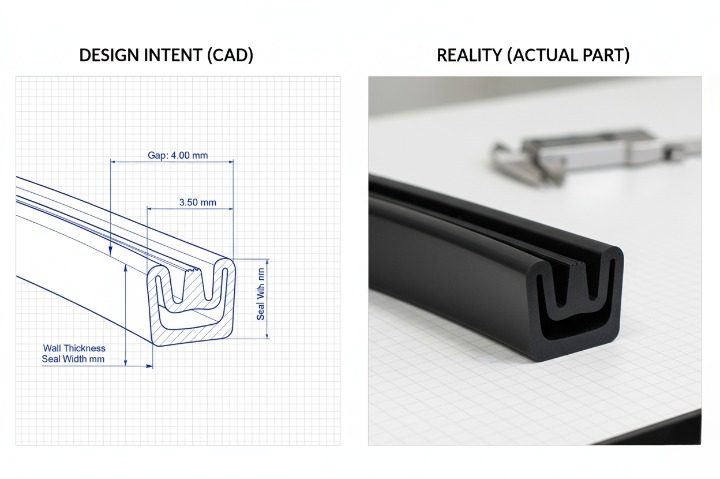
1. Guessing the Gap (Instead of Measuring It Right)
It always starts with “we’ll finalize it later.” Spoiler: you won’t.
When the groove or seal gap is off even by 1.5 mm the inflatable seal either pinches (too small) or bunches up and wears fast (too big).
We’ve seen seals fail in the first cycle because of this.
👉 Measure your gap width, movement range, and operating pressure precisely. Mock it up even a simple 3D-printed groove test can expose alignment errors early.
Inflatable seal sizing isn’t guesswork. It’s geometry.
2. Skipping the Inflation Gap Check
Here’s a mistake that doesn’t show up until testing day.
The groove’s perfect, the material’s perfect but the inflation gap is uneven.
What happens next?
The seal inflates like a lopsided balloon tight on one side, lazy on the other and the system leaks.
👉 Keep your inflation gap uniform (4–5 mm for silicone and EPDM).
Avoid tight corners and check for clearance all around the seal circumference. Even expansion = even pressure = no leaks.
This one step prevents most inflatable seal failures we see in pharma equipment and vacuum systems.
3. Rough Grooves Kill Good Seals
You can design the perfect inflatable rubber seal, but if your groove surface is rough, it’s doomed.
Sharp edges or machining marks act like sandpaper. Every inflation cycle cuts into the rubber a little more until it tears.
👉 Specify your groove design with a surface finish better than Ra 1.6 µm, and check for burrs.
If you can feel a ridge with your nail, it’s not ready.
A smooth groove is the cheapest insurance you’ll ever buy.
4. Using the Wrong Material (Because It “Looks Fine”)
Silicone’s popular, sure. But silicone in an oily setup? That’s a short-lived friendship.
Each elastomer behaves differently:
- Nitrile (NBR): Oils, fuels, grease
- EPDM: Steam, weather, ozone
- Fluorocarbon (FKM/Viton): Chemicals, solvents, high heat
- Silicone: Cleanrooms, pharma, and food contact
Choosing the wrong seal material is like using a paper umbrella in a rainstorm technically, it’s still an umbrella.
5. Overinflating Like It’s a Tire
This one’s a classic. Someone thinks “more air = better sealing.” It doesn’t. Overinflation = early failure.
We’ve seen inflatable seals rated for 2 bar get pumped to 5 bar “just to be safe.” The result? Split seams and validation delays.
👉 Stick to the operating pressure your supplier recommends.
Inflate slowly 8 to 10 seconds using a flow regulator. Control pressure, don’t fight it.
6. Axial vs Radial Confusion
A radial inflatable seal and an axial inflatable seal do not behave the same. Get this wrong, and the pressure goes sideways literally.
Axial seals expand forward (door faces, hatches).
Radial seals expand outward (circular flanges, shafts).
If your inflatable seal design doesn’t match your force direction, expect leaks, bulges, or jamming.
Always visualize where the pressure acts before finalizing your profile.
7. No Retention Plan
This one’s the silent killer.
You inflate the seal, and halfway through, it starts crawling out of the groove.
That’s what happens when retention isn’t part of the design.
Choose your retention method early:
- Snap-in: For quick installs and moderate vibration
- Fasten-in: For heavy vibration and longer runs
- Bonded bottom: When you want it permanent and foolproof
If the seal’s moving even slightly it’s not retained right.
Let’s Be Real.
No one plans to mess up their inflatable seal sizing.
You’re juggling designs, deadlines, and validation checklists. A few millimeters off doesn’t feel like a big deal until the first leak test.
That’s when you hear the faint hiss.
Everyone goes quiet.
And someone mutters, “it should’ve worked.”
Spend the extra hour checking your sizing, gap, and groove.
You’ll save yourself from a long night with leak detectors and unhappy clients.


No comment yet, add your voice below!