How to Choose the Right Inflatable Seal for Irregular Gaps and Moving Assemblies
Learn how to select the right inflatable seal for irregular gaps and moving parts. Covers gap types, inflation pressure, material choices, and mounting styles.
Not Every Seal Fits Every Gap, Especially the Tricky Ones
If you’ve worked on equipment where the doors don’t align perfectly, where tolerances stack up, or where things just move you already know: sealing gets complicated fast.
That’s where inflatable seals come in. These are not your everyday rubber gaskets. They expand on demand, conform to uneven surfaces, and seal precisely where and when you need them to.
But if you think “just grab any inflatable seal” think again. Picking the right one means understanding your gap, your pressures, your materials, and your mounting setup. Let’s walk through it simply, and from an engineer’s point of view.
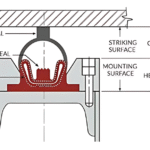
Step 1: What Kind of Gap Are You Dealing With?
It all starts here. Different assemblies need different inflation behaviors. Here’s a quick breakdown:
Gap Type | Common Use Case / Looks Like | Recommended Expansion Direction |
|---|---|---|
Axial | Two flat surfaces pressing against each other | Axial Inflation (seal expands vertically between faces) |
Radial-Outward | Circular openings like lids, manways, or hatches | Radial-Outward Inflation (seal expands outward from its inner diameter) |
Radial-Inward | External flanges or containers sealed from the outside | Radial-Inward Inflation (seal expands inward toward center) |
Irregular/Variable Gap | Gaps caused by movement, tolerances, or misalignment | U-Profile or Custom Axial Seal (flexible and forgiving geometry) |
Quick tip: Axial and radial-out seals are the most forgiving when things aren’t perfectly aligned. If your gap changes with movement, stick with something soft and adaptable.
Step 2: What Kind of Pressure Are You Sealing Against?
The key is to inflate slightly higher than the pressure you’re sealing against. If you underinflate, you risk leaks. Overinflate, and the seal wears out too soon.
💡 A good rule of thumb:
Inflation Pressure = Internal Pressure + 1 to 1.3 bar
Examples:
- If both sides are at 1 bar → inflate to 1 bar
- If the chamber has 1.5 bar pressure → inflate to 2.5–3 bar
✔️ Non-reinforced seals are good up to ~2 bar
✔️ For anything higher, go with fabric-reinforced inflatable diaphragms
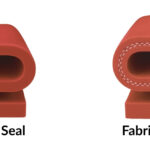
Step 3: Non-Reinforced or Fabric-Reinforced. Which One Fits?
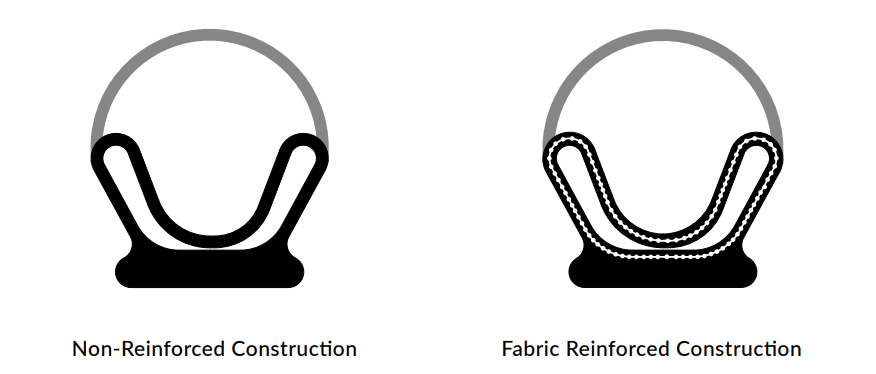
This is one of the most important calls in the design process and it depends entirely on your pressure and movement requirements.
🧱 Non-Reinforced Inflatable Seals
These are made using elastomers like silicone or EPDM, and are commonly used when:
- Your internal pressure is below 2 bar
- The sealing surface is irregular or slightly misaligned
- You want a cost-effective, flexible solution for standard sealing jobs
These seals are highly adaptable and ideal when you need the seal to conform well without added stiffness.
🦾 Fabric-Reinforced Inflatable Seals
When your application gets more demanding, reinforcement adds durability and dimensional stability. Choose this when:
- Pressure exceeds 2 bar
- There’s frequent cycling (inflation/deflation)
- You need a tougher build for better control and seal reliability
Reinforced seals offer longer lifespan and consistent performance, especially in tight-tolerance or repeat-use equipment.
Step 4: Use the Right Material (It’s Worth It)
Picking the right rubber matters. It’s not just about the seal shape it’s about whether the material can handle what you throw at it.
Material | Temperature Range | Best For |
|---|---|---|
Silicone | -60°C to +230°C | Heat, ozone, UV, cleanrooms |
EPDM | -50°C to +150°C | Steam, water, weather |
Nitrile (NBR) | -40°C to +120°C | Oils, fuels, and greases |
Viton / FKM | Up to 250°C | Chemicals, solvents, high heat |
If you’re dealing with extreme conditions, Western Rubbers offers custom Inflatable Seals and even hybrid blends tailored to your setup.
Step 5: Will the Seal Stay Put?
Even the best seal won’t do its job if it shifts or dislodges during operation. That’s where retention systems come in.
Whether you’re bonding the seal, snapping it in, clamping it with hardware, or using a dovetail groove — you’ve got options. We’ve explained each profile type (Footless, Fasten-In, Snap-In, Slot-Fit) in more detail here:
🔗 Read: Choosing the Right Inflatable Seal »
A Few Common Mistakes (We’ve Seen Them All)
Even with the best intentions, these slip-ups are surprisingly common:
- Leaving too much of a gap — makes the seal work harder than it should, leading to early wear
- Overinflating the seal — more pressure doesn’t always mean better performance; it can actually cause damage
- Choosing the wrong material — like using silicone where oil resistance is needed (we’ve seen that mistake a lot)
- Skipping the retention mechanism — no matter how good the seal is, if it shifts during operation, you’ve got a problem
- Not aligning the expansion direction with the application — sounds obvious, but it’s a subtle one many engineers overlook
✅ Quick Checklist Before You Lock the Design
Ask yourself these before you move to production:
- Do I know the exact gap type axial, radial, or a mix of both?
- What pressure is the seal really going to face, and how often?
- Is reinforcement necessary for this application, or is a non-reinforced seal enough?
- Am I choosing the right rubber material based on temperature and media?
- How is this seal going to be mounted and will it actually stay in place?
If any of those make you hesitate, that’s okay. We’re here to help figure it out.
Let’s Seal the Right Way Together
At Western Rubbers, we don’t just make inflatable seals, we help you design them right.
From profile to performance, every seal is engineered to fit your application.
Don’t let an overlooked seal design cause downtime later. Let’s get it right together.
📩 Email us at sales@westernrubbers.com
🔗 Or explore our inflatable seals page to get started.
No comment yet, add your voice below!